
使用 Minimal APIs 技术
使用 Minimal APIs
在本章中,我们将尝试采用 .NET 早期版本的中提供的一些高级开发技术,我们将其细分为四个相互独立的主题。 我们将介绍前端接口和配置管理的生产力话题和最佳实践,还有每个开发人员或迟或早遇到我们在本章中描述的问题, 例如程序员必须编写的 API 文档; 必须满足 API 和前端 JavaScript 通信;必须处理错误并尝试修复它们,必须根据参数配置应用程序。
因此本章中涉及的主题概述如下:
- 探索 Swagger
- 支持 CORS
- 使用全局 API 设置
- 错误处理
技术要求
如前几章所述,我们需要 .NET 6 开发框架; 此外还需要使用 .NET 工具来运行内存中的 Web 服务器。
为了验证 跨源资源共享 (CORS) 的功能,还需要有一个与我们托管 API 的地址不同的 HTTP 地址上的前端应用程序。
为了测试我们将在本章中提到的 CORS 示例,我们需要一个简易的内存中的 Web 服务器,以托管一个简单的静态 HTML 页面。
因此,我们将使用 LiveReloadServer 来托管网页(HTML 和 JavaScript),您可以使用以下命令将其安装为 .NET 工具:
1
$ dotnet tool install -g LiveReloadServer
本章中的所有代码示例都可以在本书的 GitHub 存储库中找到,网址为: https://github.com/PacktPublishing/Minimal-APIs-in-ASP.NET-Core-6/tree/main/Chapter03.
探索 Swagger
Swagger 在很大程度上进入了 .NET 开发人员的生活; 它已出现在多个版本的 Visual Studio 的项目架上。
Swagger 是一种基于 OpenAPI 规范的工具,允许您使用 Web 应用程序文档化 API。 根据 https://oai.github.io/Documentation/introduction.xhtml 提供的官方文档描述如下:
OpenAPI 规范允许描述可通过 HTTP 或类 HTTP 协议访问的远程 API。
API 定义了两个软件之间允许的交互,就像用户界面定义了用户可以与程序交互的方式一样。
API 由一系列可供调用的方法(发出的请求)、它们的参数、返回值和它们需要的任何数据格式(以及其他内容)组成。 这相当于用户与手机应用程序的交互仅限于应用程序用户界面中的按钮、滑块和文本框。
Visual Studio 脚手架中的 Swagger
然后我们了解到,正如我们在 .NET 世界中所知,Swagger 只不过是为所有公开基于 Web API 的应用程序定义的一组规范:

通过选择 “启用 OpenAPI 支持“,Visual Studio 会添加一个名为 Swashbuckle.AspNetCore 的 NuGet 包,并自动在 Program.cs 文件中对其进行配置。
我们展示了新项目中添加的几行代码。 有了这一段配置,Web 应用程序只在开发环境中启用,这允许开发人员直接测试 API,而无需生成客户端或使用应用程序外部的工具:
1
2
3
4
5
6
7
8
9
10
11
12
13
var builder = WebApplication.CreateBuilder(args);

// below two lines setup Swagger
builder.Services.AddEndpointsApiExplorer();
builder.Services.AddSwaggerGen();

var app = builder.Build();
if (app.Environment.IsDevelopment())
{
    // below two lines enable Swagger
    app.UseSwagger();
    app.UseSwaggerUI();
}
Swagger 生成的可视化部分大大提高了生产力,并允许开发人员与将与应用程序交互的人员共享信息,无论是前端应用程序还是机器应用程序。
注意
再次提醒,强烈建议不要在生产环境中启用 Swagger,因为敏感信息可能会公开暴露在 Web 或应用程序所在的网络上。
我们已经了解了如何将 Swagger 引入我们的 API 应用程序; 此功能允许我们文档化我们的 API,并允许用户生成客户端来调用我们的应用程序。 让我们看看我们可以使用哪些选项来快速将应用程序与 OpenAPI 描述的 API 连接起来。
OpenAPI Generator
使用 Swagger,尤其是使用 OpenAPI 标准,您可以自动生成客户端以连接到 Web 应用程序。 可以为多种语言生成客户端,也可以为开发工具生成客户端。 我们知道编写客户端访问 Web API 是多么繁琐和重复。 Open API Generator 帮助我们自动生成代码,检查 Swagger 和 OpenAPI 制作的 API 文档,并自动生成与 API 接口的代码。 简单、容易,最重要的是,快速。
npm 包 @openapitools/openapi-generator-cli 是一个非常著名的 OpenAPI Generator 的包装器,您可以在 https://openapi-generator.tech/ 找到它。
使用此工具,您可以为各种编程语言生成客户端以及 JMeter 和 K6 等负载测试工具。
无需在您的计算机上安装该工具,只要从计算机可访问应用程序的 URL,可以使用 Docker 映像,如以下命令所述:
1
2
3
4
5
docker run --rm \
    -v ${PWD}:/local openapitools/openapi-generator-cli generate \
    -i /local/petstore.yaml \
    -g go \
    -o /local/out/go
该命令允许您使用挂载在 Docker 卷上的 petstore.yaml 文件中找到的 OpenAPI 定义以生成 Go 客户端。
现在,让我们详细了解如何在 .NET 6 项目中使用 Swagger,并应用到 Minimal API 中。
Swagger in minimal APIs
在 ASP.NET Web API 中,如以下代码片段所示,我们看到一个方法记录在 C# 代码注释中,带有三重斜杠 (///)。
文档部分用于向 API 描述添加更多信息。 此外,ProducesResponseType 特性帮助 Swagger 识别客户端必须处理的可能代码作为方法调用的结果:
1
2
3
4
5
6
7
8
9
10
11
12
13
14
15
16
/// <summary>
/// Creates a Contact.
/// </summary>
/// <param name="contact"></param>
/// <returns>A newly created Contact</returns>
/// <response code="201">Returns the newly created contact</response>
/// <response code="400">If the contact is null</response>
[HttpPost]
[ProducesResponseType(StatusCodes.Status201Created)]
[ProducesResponseType(StatusCodes.Status400BadRequest)]
public async Task<IActionResult> Create(Contact contactItem)
{
     _context.Contacts.Add(contactItem);
     await _context.SaveChangesAsync();
     return CreatedAtAction(nameof(Get), new { id = contactItem.Id }, contactItem);
}
Swagger,除了对单个方法的注释之外,注释文档还指示 Swagger 向那些随后必须使用 API 应用程序的人提供更多信息。 那些需要接口的人总是欢迎对参数方法的描述; 但不幸的是,Minimal API 中不支持此功能。
让我们逐步看看如何在单个方法上开始使用 Swagger:
1
2
3
4
5
6
7
8
9
10
11
12
13
14
15
16
17
18
19
20
21
22
23
24
25
26
var builder = WebApplication.CreateBuilder(args);
builder.Services.AddEndpointsApiExplorer();
builder.Services.AddSwaggerGen(c =>
{
    c.SwaggerDoc("v1", new()
    {
        Title = builder.Environment.ApplicationName,
        Version = "v1",
        Contact = new()
        {
           Name = "PacktAuthor",
           Email = "authors@packtpub.com",
           Url = new Uri("https://www.packtpub.com/")
        },
        Description = "PacktPub Minimal API - Swagger",
        License = new Microsoft.OpenApi.Models.OpenApiLicense(),
        TermsOfService = new("https://www.packtpub.com/")
    });
});

var app = builder.Build();
if (app.Environment.IsDevelopment())
{
    app.UseSwagger();
    app.UseSwaggerUI();
}
在这第一个示例中,我们配置了 Swagger 和常用的 Swagger 信息。 我们还包含了丰富 Swagger UI 的附加信息。 这里唯一的必填信息是标题,而版本、联系方式、描述、许可证和服务条款是可选的。
UseSwaggerUI() 方法明确使用 OpenAPI 格式并自动配置将 UI 和描述 API 的 JSON 文件放置在何处。
这是现代桌面浏览器显示结果:
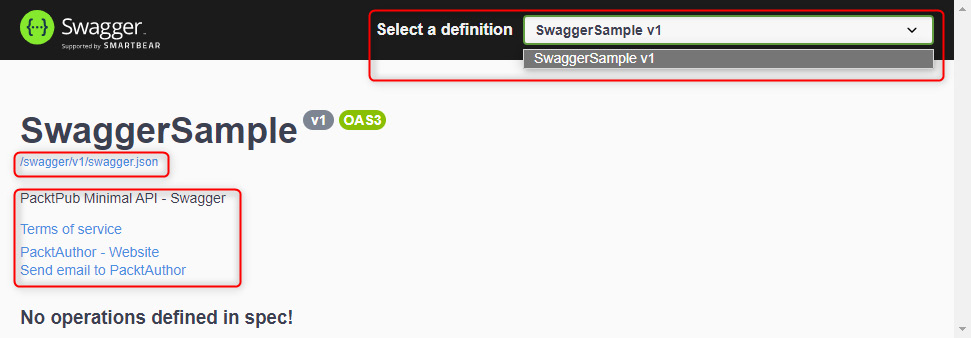
我们立即可以看到 OpenAPI 契约信息已经放在了 /swagger/v1/swagger.json 路径下。
联系信息已自动展示,但没有下面任何接口操作的文档,因为我们尚未开发任何接口操作。 API 应该有版本控制吗?是的,在右上角有个下拉框,我们可以选择具体的版本,已查看其可用的操作。
我们可以自定义 Swagger URL 并将 JSON 文档对应到新路径;这里重要的是使用 SwaggerEndpoint 来实现,类似如下:
1
2
app.UseSwaggerUI(c => c.SwaggerEndpoint("/swagger/v1/swagger.json",
    $"{builder.Environment.ApplicationName} v1"));
接下来让我们添加具体业务逻辑的端点。
配置和定义 RouteHandlerBuilder 非常重要,因为它允许我们描述在代码中编写的端点的各种属性。
Swagger 的 UI 应当尽可能的丰富,因此,我们必须尽可能多的描述 Minimal API 所允许我们可以指定或者修改的内容。 但遗憾的是,并非所有 ASP.NET Web API 中的功能都可用。
Minimal APIs 中的版本控制
Minimal APIs 中的版本控制在当前框架中并不能处理;也就是说,Swagger 也不会在 UI 上显示 API 的多版本控制。 因此,我们观察到,当我们看到上图 3.2 所示的 “选择定义” 部分时,只有当前版本的 API 的一个条目可见。
Swagger 功能
我们刚刚了解到,并非所有功能都可以在 Swagger 中使用;现在让我们探索一下当前可用的方法。
为了描述端点可能的输出信息,我们需要调用附加在处理程序之后调用的一些函数,例如我们现在要探讨的 Produces 或 WithTags 函数。
Produces 函数对所有返回给我们已知的客户端的端点的各种可能响应做装饰。
我们可以为操作添加名称(OperationId);此信息不会出现在 Swagger 屏幕中,但它将是客户端创建调用端点的方法的标识名称。
OperationId 是处理程序提供的操作的唯一名称。
要从 API 描述中排除某个端点,您需要调用 ExcludeFromDescription()。
此函数很少使用,但在一些特定情况和场景非常有用,例如端点是底层或内部接口,但又不想暴露给前端开发人员。
最后,我们可以添加和标记各种端点并将它们分割以更好地进行客户端管理:
1
2
3
4
5
6
7
8
9
10
11
12
13
14
15
16
17
app.MapGet("/sampleresponse", () =>
    {
        return Results.Ok(new ResponseData("My Response"));
    })
    .Produces<ResponseData>(StatusCodes.Status200OK)
    .WithTags("Sample")
    .WithName("SampleResponseOperation"); // operation ids to Open API

app.MapGet("/sampleresponseskipped", () =>
    {
        return Results.Ok(new ResponseData("My Response Skipped"));
    })
    .ExcludeFromDescription();

app.MapGet("/{id}", (int id) => Results.Ok(id));
app.MapPost("/", (ResponseData data) => Results.Ok(data))
   .Accepts<ResponseData>(MediaTypeNames.Application.Json);
如下这是 Swagger 的图形结果;正如我之前预期的那样,标签和操作 ID 不在 Web 客户端显示:
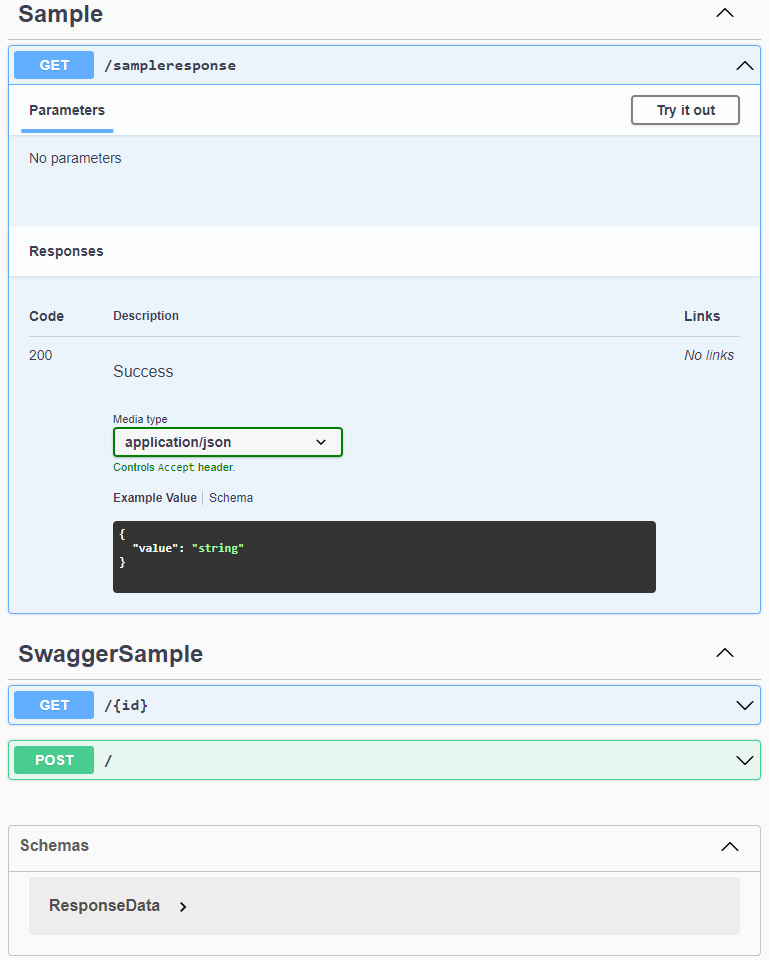
正因如此。从另一个角度来看,包含端点描述将是非常有用的。 当然实现起来非常简单:只需在方法中插入 C# 注释(只需在方法中插入三个斜杠 ///)。 Minimal API 没有像我们在基于 Web 的控制器中所惯用的方法,因为它们不受原生支持的。
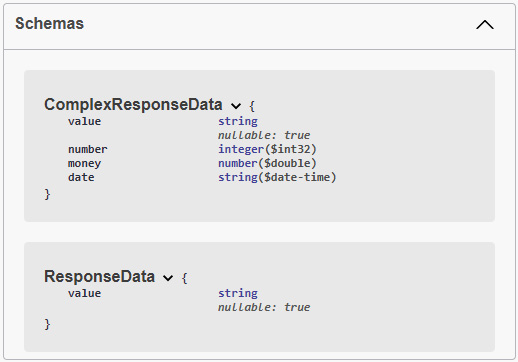
Swagger 不仅仅是我们习惯看到的 GUI。实际上,Swagger 是支持 OpenAPI 规范的 JSON 文件,较新版本为3.1.0。
在下面的代码片段中,我们展示了包含我们在 API 中插入的第一个端点的描述的部分。 我们可以推断出标签和操作 ID;这些信息将由那些与 API 交互的人员使用:
1
2
3
4
5
6
7
8
9
10
11
12
13
14
15
16
17
18
19
20
21
"paths": {
    "/sampleresponse": {
        "get": {
            "tags": [
                "Sample"
            ],
            "operationId": "SampleResponseOperation",
            "responses": {
            "200": {
                "description": "Success",
                "content": {
                    "application/json": {
                        "schema": {
                            "$ref": "#/components/schemas/ResponseData"
                        }
                    }
                }
            }
        }
    }
},
在本节中,我们已经看到了如何配置 Swagger 以及目前还不支持的内容。
在接下来的章节中,我们还将看到如何配置 OpenAPI,包括对 OpenID Connect 标准和通过 API 密钥进行身份验证。
在前面的 Swagger UI 代码片段中,Swagger 提供了涉及的对象的示意图,包括进入各个端点的入站和从它们出站的出站。
在第六章中,我们将学习如何处理这些对象以及如何验证和定义它们,探索验证和映射。
Swagger OperationFilter
操作过滤器允许您为 Swagger 显示的所有操作添加行为。
在下面的示例中,我们将向您展示如何为特定调用添加一个 HTTP 头部,通过 OperationId 过滤它。
当您去定义一个操作过滤器时,您也可以基于路由、标签和操作 ID 设置过滤器:
1
2
3
4
5
6
7
8
9
10
11
12
13
14
15
16
17
18
19
20
21
22
23
24
25
26
27
28
29
30
31
32
33
34
35
36
public class CorrelationIdOperationFilter : IOperationFilter
{
    private readonly IWebHostEnvironment environment;
    public CorrelationIdOperationFilter(IWebHostEnvironment environment)
    {
        this.environment = environment;
    }

    /// <summary>
    /// Apply header in parameter Swagger.
    /// We add default value in parameter for developer environment
    /// </summary>
    /// <param name="operation"></param>
    /// <param name="context"></param>
    public void Apply(OpenApiOperation operation, OperationFilterContext context)
    {
        if (operation.Parameters == null)
        {
            operation.Parameters = new List<OpenApiParameter>();
        }
        if (operation.OperationId == "SampleResponseOperation")
        {
             operation.Parameters.Add(new OpenApiParameter
             {
                 Name = "x-correlation-id",
                 In = ParameterLocation.Header,
                 Required = false,
                 Schema = new OpenApiSchema
                 {
                     Type = "String",
                     Default = new OpenApiString("42")
                 }
             });
        }
    }
}
要定义操作过滤器,必须实现 IOperationFilter 接口。
在构造函数中,您可以定义所有已在依赖注入引擎中注册的接口或对象。
然后,过滤器由一个名为 Apply 的方法组成,该方法提供两个对象:
- OpenApiOperation:一个操作,我们可以在其中添加参数或检查当前调用的操作 ID
- OperationFilterContext:过滤器上下文,允许您读取 ApiDescription,您可以在其中找到当前端点的 URL
最后,要在 Swagger 中启用操作过滤器,我们需要在 SwaggerGen 方法中注册它。 在此方法中,我们应添加过滤器,如下所示
1
2
3
4
5
builder.Services.AddSwaggerGen(c =>
{
     // ... removed for brevity
     c.OperationFilter<CorrelationIdOperationFilter>();
});
以下是用户界面看到的结果;在端点中,只有对于特定的操作 ID,我们将有一个新的必填头部,该头部带有一个默认参数,在开发中不需要手动插入:
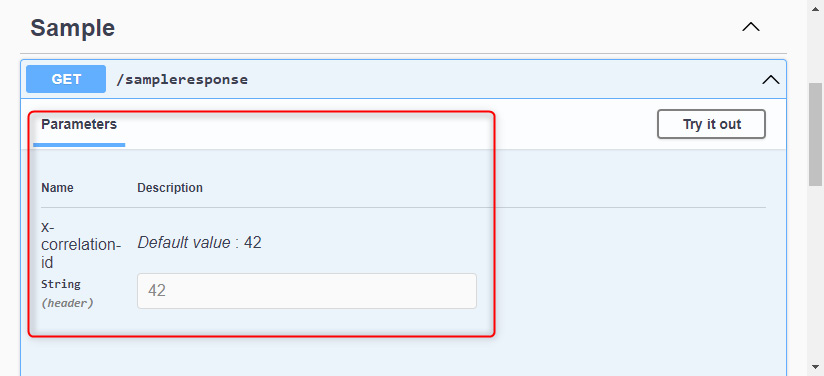
此案例研究在我们需要设置 API key 且不希望在每次调用时都插入它时,对我们帮助很大。
生产环境中的操作过滤器
由于在生产环境中不应启用 Swagger,因此过滤器及其默认值不会造成应用程序安全问题。
强烈建议您在生产环境中禁用 Swagger。
在本节中,我们了解了如何启用一个 UI 工具,该工具描述了 API 并允许我们对其进行测试。 在下一节中,我们将看到如何通过 CORS 启用单页应用程序(SPAs)与后端的调用。
启用 CORS
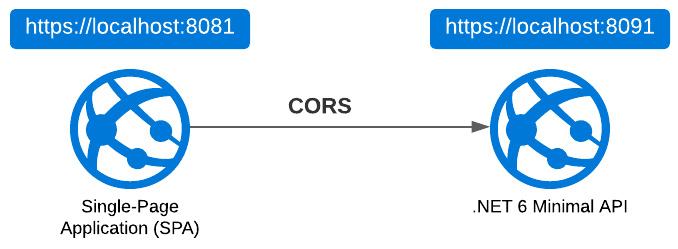
CORS(跨源资源共享)是一种安全机制,通过该机制,如果HTTP/S请求来自于与托管应用程序不同的域,则该请求会被阻止。 更多信息可以在Microsoft文档或Mozilla开发者站点上找到。
浏览器默认会阻止网页向除了提供该网页的域之外的任何域发起请求。 一个网页、单页应用程序(SPA)或服务器端网页可以向托管在不同源上的几个后端API发起HTTP请求。
这种限制被称为同源策略。同源策略防止恶意网站读取另一个网站的数据。 浏览器不会阻止HTTP请求,但会阻止响应数据。
因此,我们理解,就安全性而言,必须谨慎评估CORS资格。
最常见的场景是,SPA发布在与托管于 Minimal API 服务的不同Web地址上的Web服务器上。
类似的场景是微服务之间需要相互通信,因为每个微服务将驻留在与其他服务不同的特定网络地址上。
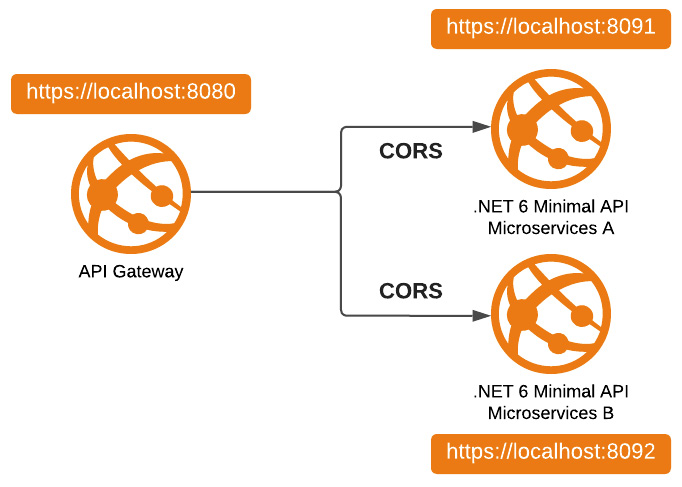
在所有这些情况下,显然都会遇到 CORS 问题。
我们现在理解了可能发生 CORS 请求的情况。 现在,让我们看看正确的 HTTP 请求流程是什么,以及浏览器如何处理请求。
CORS flow from an HTTP request
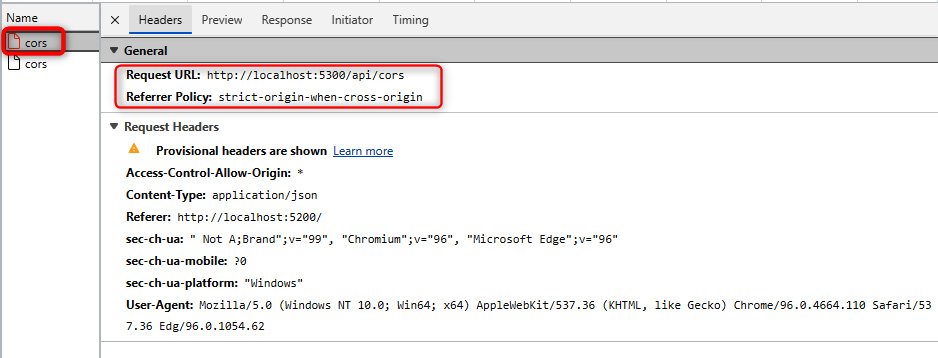
What happens when a call leaves the browser for a different address other than the one where the frontend is hosted?
The HTTP call is executed and it goes all the way to the backend code, which executes correctly.
The response, with the correct data inside, is blocked by the browser. That’s why when we execute a call with Postman, Fiddler, or any HTTP client, the response reaches us correctly.
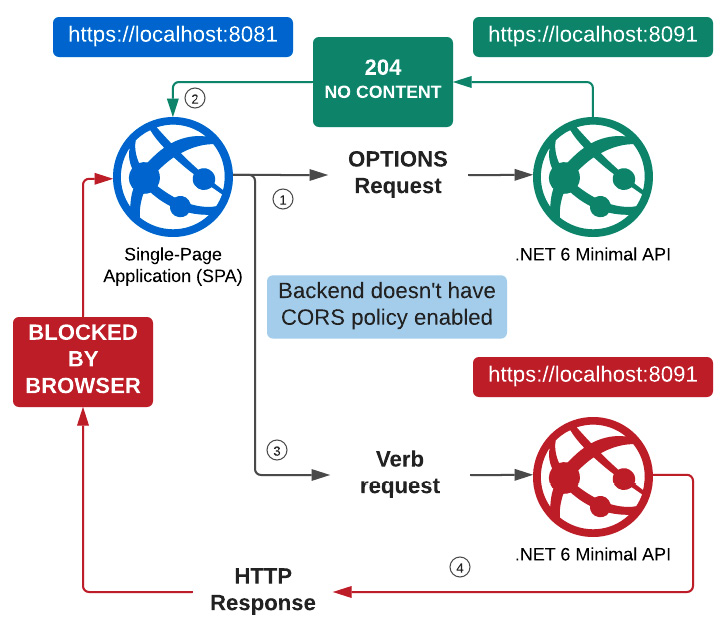
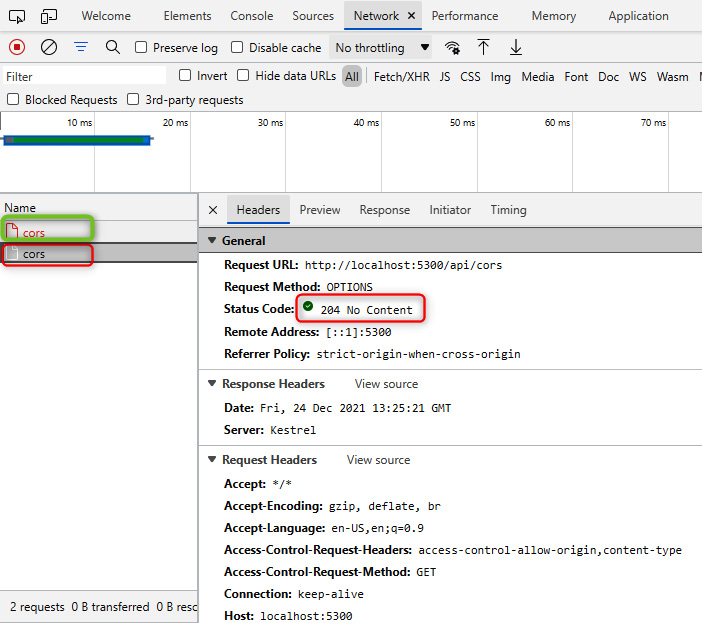
In the following figure, we can see that the browser makes the first call with the OPTIONS method, to which the backend responds correctly with a 204 status code:
In the second call that the browser makes, an error occurs; the strict-origin-when-cross-origin value is shown in Referrer Policy, which indicates the refusal by the browser to accept data from the backend:
When CORS is enabled, in the response to the OPTIONS method call, three headers are inserted with the characteristics that the backend is willing to respect:
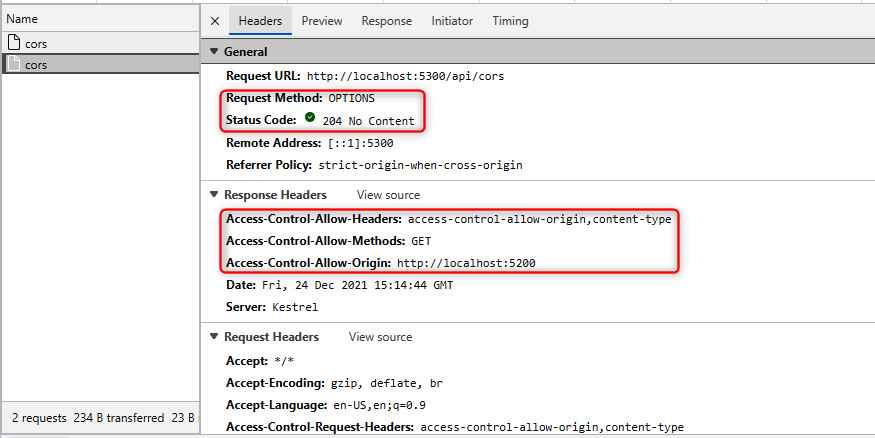
In this case, we can see that three headers are added that define Access-Control-Allow-Headers, Access-Control-Allow-Methods, and Access-Control-Allow-Origin.
The browser with this information can accept or block the response to this API.
Setting CORS with a policy
Many configurations are possible within a .NET 6 application for activating CORS. We can define authorization policies in which the four available settings can be configured. CORS can also be activated by adding extension methods or annotations.
But let us proceed in order.
The CorsPolicyBuilder class allows us to define what is allowed or not allowed within the CORS acceptance policy.
We have, therefore, the possibility to set different methods, for example:
- AllowAnyHeader
- AllowAnyMethod
- AllowAnyOrigin
- AllowCredentials
While the first three methods are descriptive and allow us to enable any settings relating to the header, method, and origin of the HTTP call, respectively, AllowCredentials allows us to include the cookie with the authentication credentials.
CORS policy recommendations
We recommend that you don’t use the AllowAny methods but instead filter out the necessary information to allow for greater security. As a best practice, when enabling CORS, we recommend the use of these methods:
- WithExposedHeaders
- WithHeaders
- WithOrigins
To simulate a scenario for CORS, we created a simple frontend application with three different buttons. Each button allows you to test one of the possible configurations of CORS within the minimal API. We will explain these configurations in a few lines.
To enable the CORS scenario, we have created a single-page application that can be launched on a web server in memory. We have used LiveReloadServer, a tool that can be installed with the .NET CLI. We talked about it at the start of the chapter and now it’s time to use it.
After installing it, you need to launch the SPA with the following command:
1
$ livereloadserver "{BasePath}\Chapter03\2-CorsSample\Frontend"
Here, BasePath is the folder where you are going to download the examples available on GitHub.
Then you must start the application backend, either through Visual Studio or Visual Studio Code or through the .NET CLI with the following command:
1
$ dotnet run .\Backend\CorsSample.csproj
We’ve figured out how to start an example that highlights the CORS problem; now we need to configure the server to accept the request and inform the browser that it is aware that the request is coming from a different source.
Next, we will talk about policy configuration. We will understand the characteristics of the default policy as well as how to create a custom one.
Configuring a default policy
To configure a single CORS enabling policy, you need to define the behavior in the Program.cs file and add the desired configurations. Let’s implement a policy and define it as Default.
Then, to enable the policy for the whole application, simply add app.UseCors(); before defining the handlers:
1
2
3
4
5
6
7
8
9
10
11
12
13
14
var builder = WebApplication.CreateBuilder(args);
var corsPolicy = new CorsPolicyBuilder("http://localhost:5200")
    .AllowAnyHeader()
    .AllowAnyMethod()
    .Build();
builder.Services.AddCors(c => c.AddDefaultPolicy(corsPolicy));

var app = builder.Build();
app.UseCors();
app.MapGet("/api/cors", () =>
{
    return Results.Ok(new { CorsResultJson = true });
});
app.Run();
Configuring custom policies
We can create several policies within an application; each policy may have its own configuration and each policy may be associated with one or more endpoints.
In the case of microservices, having several policies helps to precisely segment access from a different source.
In order to configure a new policy, it is necessary to add it and give it a name; this name will give access to the policy and allow it to be associated with the endpoint.
The customized policy, as in the previous example, is assigned to the entire application:
1
2
3
4
5
6
7
8
9
10
11
12
13
var builder = WebApplication.CreateBuilder(args);
var corsPolicy = new CorsPolicyBuilder("http://localhost:5200")
    .AllowAnyHeader()
    .AllowAnyMethod()
    .Build();
builder.Services.AddCors(options => options.AddPolicy("MyCustomPolicy", corsPolicy));
var app = builder.Build();
app.UseCors("MyCustomPolicy");
app.MapGet("/api/cors", () =>
{
    return Results.Ok(new { CorsResultJson = true });
});
app.Run();
We next look at how to apply a single policy to a specific endpoint; to this end, two methods are available. The first is via an extension method to the IEndpointConventionBuilder interface. The second method is to add the EnableCors annotation followed by the name of the policy to be enabled for that method.
Setting CORS with extensions
It is necessary to use the RequireCors method followed by the name of the policy.
With this method, it is then possible to enable one or more policies for an endpoint:
1
2
3
4
5
app.MapGet("/api/cors/extension", () =>
{
    return Results.Ok(new { CorsResultJson = true });
})
.RequireCors("MyCustomPolicy");
Setting CORS with an annotation
The second method is to add the EnableCors annotation followed by the name of the policy to be enabled for that method:
1
2
3
4
app.MapGet("/api/cors/annotation", [EnableCors("MyCustomPolicy")] () =>
{
   return Results.Ok(new { CorsResultJson = true });
});
Regarding controller programming, it soon becomes apparent that it is not possible to apply a policy to all methods of a particular controller. It is also not possible to group controllers and enable the policy. It is therefore necessary to apply the individual policy to the method or the entire application.
In this section, we found out how to configure browser protection for applications hosted on different domains.
In the next section, we will start configuring our applications.
Working with global API settings
We have just defined how you can load data with the options pattern within an ASP.NET application. In this section, we want to describe how you can configure an application and take advantage of everything we saw in the previous section.
With the birth of .NET Core, the standard has moved from the Web.config file to the appsettings.json file. The configurations can also be read from other sources, such as other file formats like the old .ini file or a positional file.
In minimal APIs, the options pattern feature remains unchanged, but in the next few paragraphs, we will see how to reuse the interfaces or the appsettings.json file structure.
Configuration in .NET 6
The object provided from .NET is IConfiguration, which allows us to read some specific configurations inside the appsettings file.
But, as described earlier, this interface does much more than just access a file for reading.
The following extract from the official documentation helps us understand how the interface is the generic access point that allows us to access the data inserted in various services:
Configuration in ASP.NET Core is performed using one or more configuration providers. Configuration providers read configuration data from key-value pairs using a variety of configuration sources.
The following is a list of configuration sources:
- Settings files, such as appsettings.json
- Environment variables
- Azure Key Vault
- Azure App Configuration
- Command-line arguments
- Custom providers, installed or created
- Directory files
- In-memory .NET objects
(https://docs.microsoft.com/aspnet/core/fundamentals/configuration/)
The IConfiguration and IOptions interfaces, which we will see in the next chapter, are designed to read data from the various providers. These interfaces are not suitable for reading and editing the configuration file while the program is running.
The IConfiguration interface is available through the builder object, builder.Configuration, which provides all the methods needed to read a value, an object, or a connection string.
After looking at one of the most important interfaces that we will use to configure the application, we want to define good development practices and use a fundamental building block for any developer: namely, classes. Copying the configuration into a class will allow us to better enjoy the content anywhere in the code.
We define classes containing a property and classes corresponding appsettings file:
Configuration classes
1
2
3
4
5
6
7
8
public class MyCustomObject
{
    public string? CustomProperty { get; init; }
}
public class MyCustomStartupObject
{
    public string? CustomProperty { get; init; }
}
And here, we bring back the corresponding JSON of the C# class that we just saw:
appsettings.json definition
1
2
3
4
5
6
7
8
9
10
11
{
    "MyCustomObject": {
         "CustomProperty": "PropertyValue"
    },
    "MyCustomStartupObject": {
         "CustomProperty": "PropertyValue"
    },
    "ConnectionStrings": {
         "Default": "MyConnectionstringValueInAppsettings"
    }
}
Next, we will be performing several operations.
The first operation we perform creates an instance of the startupConfig object that will be of the MyCustomStartupObject type. To populate the instance of this object, through IConfiguration, we are going to read the data from the section called MyCustomStartupObject:
1
2
var startupConfig = builder.Configuration.GetSection(nameof(MyCustomStartupObject))
    .Get<MyCustomStartupObject>();
The newly created object can then be used in the various handlers of the minimal APIs.
Instead, in this second operation, we use the dependency injection engine to request the instance of the IConfiguration object:
1
2
3
4
app.MapGet("/read/configurations", (IConfiguration configuration) =>
{
    var customObject = configuration.GetSection(nameof(MyCustomObject))
        .Get<MyCustomObject>();
With the IConfiguration object, we will retrieve the data similarly to the operation just described. We select the GetSection(nameof(MyCustomObject)) section and type the object with the Get
Finally, in these last two examples, we read a single key, present at the root level of the appsettings file:
1
2
MyCustomValue = configuration.GetValue<string>("MyCustomValue"),
ConnectionString = configuration.GetConnectionString("Default"),
The configuration.GetValue
In the next line, we can see how you can leverage an IConfiguration method to read ConnectionString.
In the appsettings file, connection strings are placed in a specific section, ConnectionStrings, that allows you to name the string and read it. Multiple connection strings can be placed in this section to exploit it in different objects.
In the configuration provider for Azure App Service, connection strings should be entered with a prefix that also indicates the SQL provider you are trying to use, as described in the following link: https://docs.microsoft.com/azure/app-service/configure-common#configure-connection-strings.
At runtime, connection strings are available as environment variables, prefixed with the following connection types:
- SQLServer: SQLCONNSTR_
- MySQL: MYSQLCONNSTR_
- SQLAzure: SQLAZURECONNSTR_
- Custom: CUSTOMCONNSTR_
- PostgreSQL: POSTGRESQLCONNSTR_
For completeness, we will bring back the entire code just described in order to have a better general picture of how to exploit the IConfiguration object inside the code:
1
2
3
4
5
6
7
8
9
10
11
12
13
14
15
var builder = WebApplication.CreateBuilder(args);
var startupConfig = builder.Configuration.GetSection(nameof(MyCustomStartupObject)).Get<MyCustomStartupObject>();
app.MapGet("/read/configurations", (IConfiguration configuration) =>
{
    var customObject = configuration.GetSection(nameof(MyCustomObject)).Get<MyCustomObject>();
    return Results.Ok(new
    {
        MyCustomValue = configuration.GetValue<string>("MyCustomValue"),
        ConnectionString = configuration.
        GetConnectionString("Default"),
        CustomObject = customObject,
        StartupObject = startupConfig
    });
})
.WithName("ReadConfigurations");
We’ve seen how to take advantage of the appsettings file with connection strings, but very often, we have many different files for each environment. Let’s see how to take advantage of one file for each environment.
Priority in appsettings files
The appsettings file can be managed according to the environments in which the application is located. In this case, the practice is to place key information for that environment in the appsettings.{ENVIRONMENT}.json file.
The root file (that is, appsettings.json) should be used for the production environment only.
For example, if we created these examples in the two files for the “Priority” key, what would we get?
appsettings.json
1
"Priority": "Root"
appsettings.Development.json
1
"Priority":"Dev"
If it is a Development environment, the value of the key would result in Dev, while in a Production environment, the value would result in Root.
What would happen if the environment was anything other than Production or Development? For example, if it were called Stage? In this case, having not specified any appsettings.Stage.json file, the read value would be that of one of the appsettings.json files and therefore, Root.
However, if we specified the appsettings.Stage.json file, the value would be read from the that file.
Next, let’s visit the Options pattern. There are objects that the framework provides to load configuration information upon startup or when changes are made by the systems department. Let’s go over how.
Options pattern
The options pattern uses classes to provide strongly typed access to groups of related settings, that is, when configuration settings are isolated by scenario into separate classes.
The options pattern will be implemented with different interfaces and different functionalities. Each interface (see the following subsection) has its own features that help us achieve certain goals.
But let’s start in order. We define an object for each type of interface (we will do it to better represent the examples), but the same class can be used to register more options inside the configuration file. It is important to keep the structure of the file identical:
1
2
3
4
5
6
7
8
9
10
11
12
13
14
15
16
17
18
19
public class OptionBasic
{
    public string? Value { get; init; }
}

public class OptionSnapshot
{
    public string? Value { get; init; }
}

public class OptionMonitor
{
    public string? Value { get; init; }
}

public class OptionCustomName
{
    public string? Value { get; init; }
}
Each option is registered in the dependency injection engine via the Configure method, which also requires the registration of the T type present in the method signature. As you can see, in the registration phase, we declared the types and the section of the file where to retrieve the information, and nothing more:
1
2
3
4
5
6
7
8
9
10
builder.Services.Configure<OptionBasic>(
    builder.Configuration.GetSection("OptionBasic"));
builder.Services.Configure<OptionMonitor>(
    builder.Configuration.GetSection("OptionMonitor"));
builder.Services.Configure<OptionSnapshot>(
    builder.Configuration.GetSection("OptionSnapshot"));
builder.Services.Configure<OptionCustomName>("CustomName1",
    builder.Configuration.GetSection("CustomName1"));
builder.Services.Configure<OptionCustomName>("CustomName2",
    builder.Configuration.GetSection("CustomName2"));
We have not yet defined how the object should be read, how often, and with what type of interface.
The only thing that changes is the parameter, as seen in the last two examples of the preceding code snippet. This parameter allows you to add a name to the option type. The name is required to match the type used in the method signature. This feature is called named options.
Different option interfaces
Different interfaces can take advantage of the recordings you just defined. Some support named options and some do not:
- IOptions
: - Does not support the following:
- Reading of configuration data after the app has started
- Named options
- Is registered as a singleton and can be injected into any service lifetime
- Does not support the following:
- IOptionsSnapshot
: - Is useful in scenarios where options should be recomputed on every request
- Is registered as scoped and therefore cannot be injected into a singleton service
- Supports named options
- IOptionsMonitor
: - Is used to retrieve options and manage options notifications for TOptions instances
- Is registered as a singleton and can be injected into any service lifetime
- Supports the following:
- Change notifications
- Named options
- Reloadable configuration
- Selective options invalidation (IOptionsMonitorCache
)
We want to point you to the use of IOptionsFactory
The Configure method can also be followed by another method in the configuration pipeline. This method is called PostConfigure and is intended to modify the configuration each time it is configured or reread. Here is an example of how to record this behavior:
1
2
3
4
builder.Services.PostConfigure<MyConfigOptions>(myOptions =>
{
   myOptions.Key1 = "my_new_value_post_configuration";
});
Putting it all together
Having defined the theory of these numerous interfaces, it remains for us to see IOptions at work with a concrete example.
Let’s see the use of the three interfaces just described and the use of IOptionsFactory, which, along with the Create method and with the named options function, retrieves the correct instance of the object:
1
2
3
4
5
6
7
8
9
10
11
12
13
14
15
app.MapGet("/read/options", (IOptions<OptionBasic> optionsBasic,
         IOptionsMonitor<OptionMonitor> optionsMonitor,
         IOptionsSnapshot<OptionSnapshot> optionsSnapshot,
         IOptionsFactory<OptionCustomName> optionsFactory) =>
{
    return Results.Ok(new
    {
        Basic = optionsBasic.Value,
        Monitor = optionsMonitor.CurrentValue,
        Snapshot = optionsSnapshot.Value,
        Custom1 = optionsFactory.Create("CustomName1"),
        Custom2 = optionsFactory.Create("CustomName2")
    });
})
.WithName("ReadOptions");
In the previous code snippet, we want to bring attention to the use of the different interfaces available.
Each individual interface used in the previous snippet has a particular life cycle that characterizes its behavior. Finally, each interface has slight differences in the methods, as we have already described in the previous paragraphs.
IOptions and validation
Last but not least is the validation functionality of the data present in the configuration. This is very useful when the team that has to release the application still performs manual or delicate operations that need to be at least verified by the code.
Before the advent of .NET Core, very often, the application would not start because of an incorrect configuration. Now, with this feature, we can validate the data in the configuration and throw errors.
Here is an example:
Register option with validation
1
2
3
4
5
6
7
8
9
10
11
12
13
builder.Services.AddOptions<ConfigWithValidation>()
    .Bind(builder.Configuration.GetSection(nameof(ConfigWithValidation)))
    // BELOW LINE ADD VALIDATION
    .ValidateDataAnnotations();

app.MapGet("/read/options", (IOptions<ConfigWithValidation> optionsValidation) =>
{
    return Results.Ok(new
    {
        Validation = optionsValidation.Value
    });
})
.WithName("ReadOptions");
This is the configuration file where an error is explicitly reported:
Appsettings section for configuration validation
1
2
3
4
“ConfigWithValidation": {
    "Email": "andrea.tosato@hotmail.it",
    "NumericRange": 1001
}
And here is the class containing the validation logic:
1
2
3
4
5
6
7
8
public class ConfigWithValidation
{
    [RegularExpression(@"^([\w\.\-]+)@([\w\-]+)((\.(\w){2,})+)$")]
    public string? Email { get; set; }

    [Range(0, 1000, ErrorMessage = "Value for {0} must be between {1} and {2}.")]
    public int NumericRange { get; set; }
}
The application then encounters errors while using the particular configuration and not at startup. This is also because, as we have seen before, IOptions could reload information following a change in appsettings:
Error validate option
1
2
3
Microsoft.Extensions.Options.OptionsValidationException:
DataAnnotation validation failed for 'ConfigWithValidation' members: 'NumericRange' with the error:
'Value for NumericRange must be between 0 and 1000.'.
Best practice for using validation in IOptions
This setting is not suitable for all application scenarios. Only some options can have formal validations; if we think of a connection string, it is not necessarily formally incorrect, but the connection may not be working.
Be cautious about applying this feature, especially since it reports errors at runtime and not during startup and gives an Internal Server Error, which is not a best practice in scenarios that should be handled.
Everything we’ve seen up to this point is about configuring the appsettings.json file, but what if we wanted to use other sources for configuration management? We’ll look at that in the next section.
Configuration sources
As we mentioned at the beginning of the section, the IConfiguration interface and all variants of IOptions work not only with the appsettings file but also on different sources.
Each source has its own characteristics, and the syntax for accessing objects is very similar between providers. The main problem is when we must define a complex object or an array of objects; in this case, we will see how to behave and be able to replicate the dynamic structure of a JSON file.
Let’s look at two very common use cases.
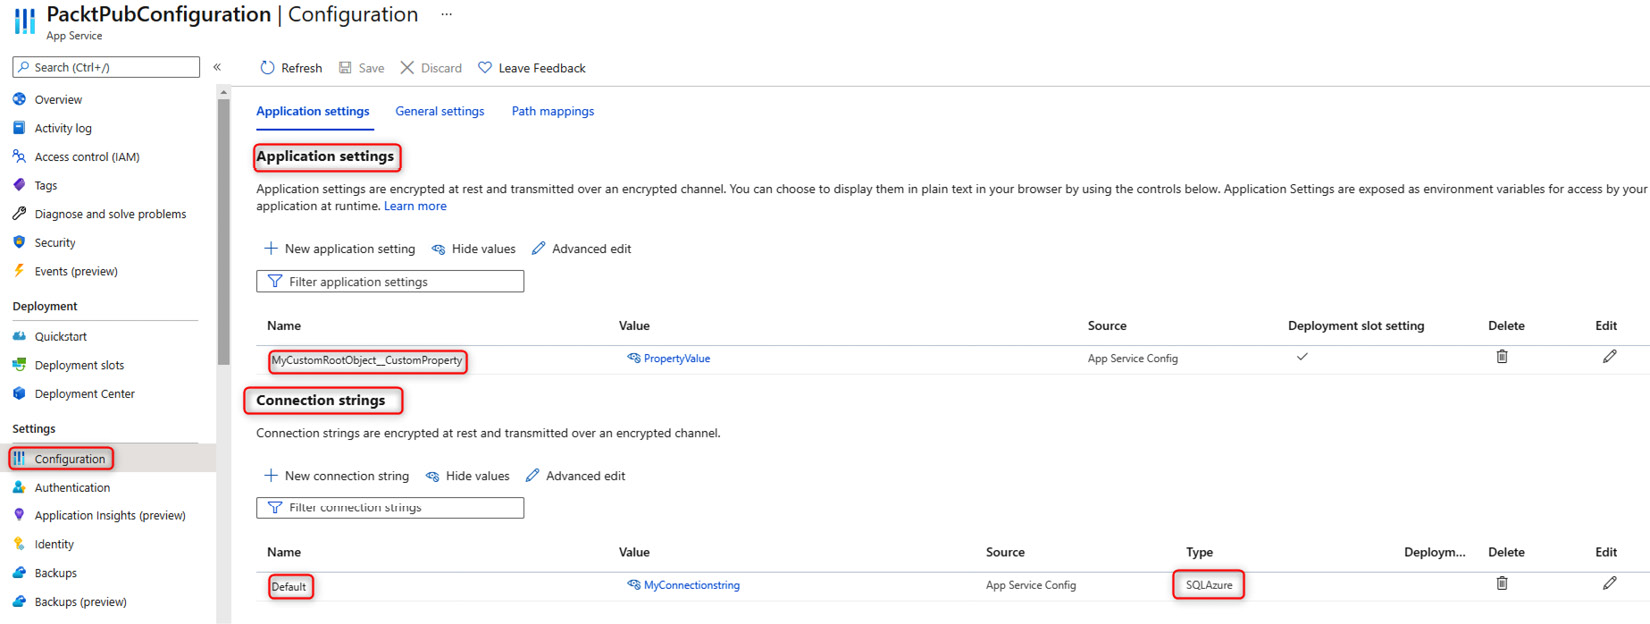
Configuring an application in Azure App Service
Let’s start with Azure, and in particular, the Azure Web Apps service.
On the Configuration page, there are two sections: Application settings and Connection strings.
In the first section, we need to insert the keys and values or JSON objects that we saw in the previous examples.
In the Connection strings section, you can insert the connection strings that are usually inserted in the appsettings.json file. In this section, in addition to the textual string, it is necessary to set the connection type, as we saw in the Configuration in .NET 6 section.
Inserting an object
To insert an object, we must specify the parent for each key.
The format is as follows:
parent__key
Note that there are two underscores.
The object in the JSON file would be defined as follows:
1
2
3
"MyCustomObject": {
    "CustomProperty": "PropertyValue"
}
So, we should write MyCustomObject__CustomProperty.
Inserting an array
Inserting an array is much more verbose.
The format is as follows:
parent__child__ArrayIndexNumber_key
The array in the JSON file would be defined as follows:
1
2
3
4
5
6
7
8
{
    "MyCustomArray": {
        "CustomPropertyArray": [
            { "CustomKey": "ValueOne" },
            { "CustomKey ": "ValueTwo" }
        ]
    }
}
So, to access the ValueOne value, we should write the following:
1
MyCustomArray__CustomPropertyArray__0__CustomKey
Configuring an application in Docker
If we are developing for containers and therefore for Docker, appsettings files are usually replaced in the docker-compose file, and very often in the override file, because it behaves analogously to the settings files divided by the environment.
We want to provide a brief overview of the features that are usually leveraged to configure an application hosted in Docker. Let’s see in detail how to define root keys and objects, and how to set the connection string. Here is an example:
1
2
3
4
5
6
7
8
9
10
11
12
13
app.MapGet("/env-test", (IConfiguration configuration) =>
{
    var rootProperty = configuration.GetValue<string>("RootProperty");
    var sampleVariable = configuration.GetValue<string>("RootSettings:SampleVariable");
    var connectionString = configuration.GetConnectionString("SqlConnection");
    return Results.Ok(new
    {
        RootProperty = rootProperty,
        SampleVariable = sampleVariable,
        Connection String = connectionString
    });
})
.WithName("EnvironmentTest");
Minimal APIs that use configuration
The docker-compose.override.yaml file is as follows:
1
2
3
4
5
6
7
services:
  dockerenvironment:
    environment:
      - ASPNETCORE_ENVIRONMENT=Development
      - ASPNETCORE_URLS=https://+:443;http://+:80
      - RootProperty=minimalapi-root-value
      - ConnectionStrings__SqlConnection=Server=minimal.db;Database=minimal_db;User Id=sa;Password=Taggia42!
There is only one application container for this example, and the service that instantiates it is called dockerenvironment.
In the configuration section, we can see three particularities that we are going to analyze line by line.
The snippet we want to show you has several very interesting components: a property in the configuration root, an object composed of a single property, and a connection string to a database.
In this first configuration, you are going to set a property that is the root of the configurations. In this case, it is a simple string:
1
2
# First configuration
- RootProperty=minimalapi-root-value
In this second configuration, we are going to set up an object:
1
2
# Second configuration
- RootSettings__SampleVariable=minimalapi-variable-value
The object is called RootSettings, while the only property it contains is called SampleVariable. This object can be read in different ways. We recommend using the Ioptions object that we have seen extensively before. In the preceding example, we show how to access a single property present in an object via code.
In this case, via code, you need to use the following notation to access the value: RootSettings:SampleVariable. This approach is useful if you need to read a single property, but we recommend using the Ioptions interfaces to access the object.
In this last example, we show you how to set the connection string called SqlConnection. This way, it will be easy to retrieve the information from the base methods available on Iconfiguration:
1
2
# Third configuration
- ConnectionStrings__SqlConnection=Server=minimal.db;Database=minimal_db;User Id=sa;Password=Taggia42!
To read the information, it is necessary to exploit this method:
1
GetConnectionString(“SqlConnection”)
There are a lot of scenarios for configuring our applications; in the next section, we will also see how to handle errors.
Error handling
Error handling is one of the features that every application must provide. The representation of an error allows the client to understand the error and possibly handle the request accordingly. Very often, we have our own customized methods of handling errors.
Since what we’re describing is a key functionality of the application, we think it’s fair to see what the framework provides and what is more correct to use.
Traditional approach
.NET provides the same tool for minimal APIs that we can implement in traditional development: a Developer Exception Page. This is nothing but middleware that reports the error in plain text format. This middleware can’t be removed from the ASP.NET pipeline and works exclusively in the development environment (https://docs.microsoft.com/aspnet/core/fundamentals/error-handling).
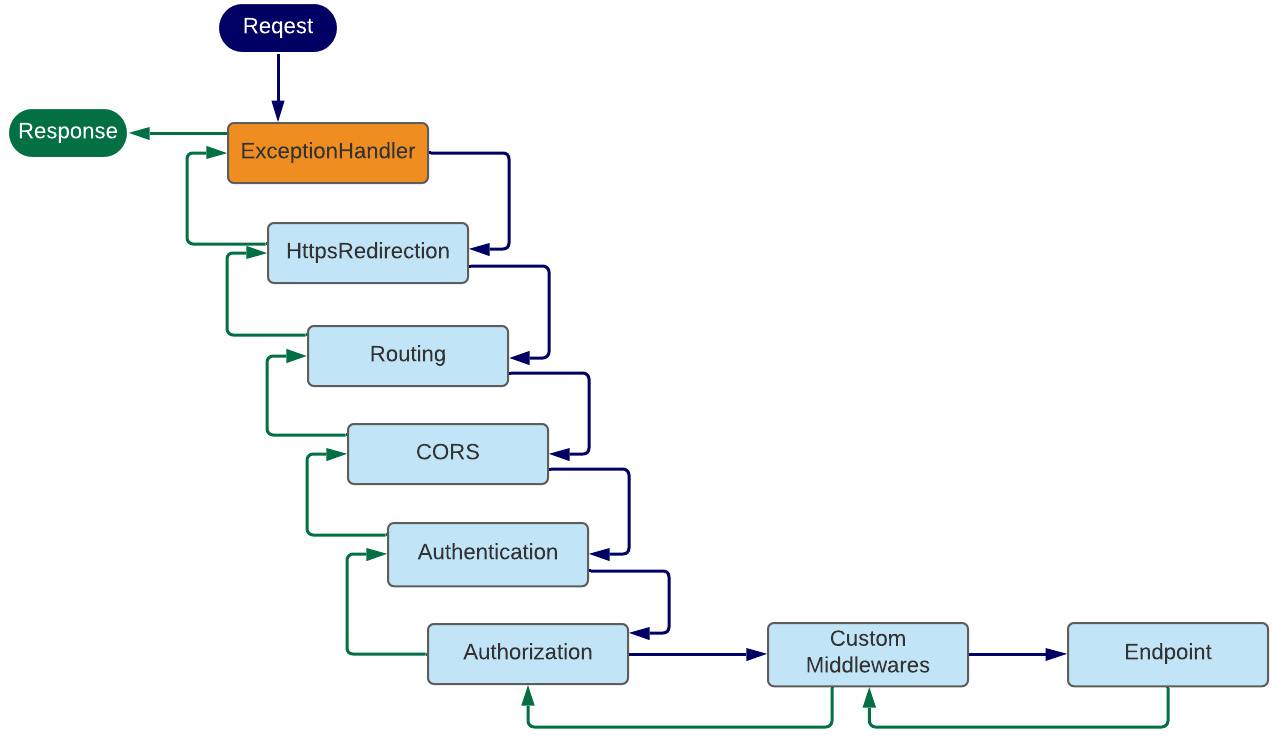
If exceptions are raised within our code, the only way to catch them in the application layer is through middleware that is activated before sending the response to the client.
Error handling middleware is standard and can be implemented as follows:
1
2
3
4
5
6
7
8
9
10
11
12
13
14
15
16
17
18
19
20
21
22
app.UseExceptionHandler(exceptionHandlerApp =>
{
    exceptionHandlerApp.Run(async context =>
    {
        context.Response.StatusCode = StatusCodes.Status500InternalServerError;
        context.Response.ContentType = Application.Json;
        var exceptionHandlerPathFeature = context.Features.Get<IExceptionHandlerPathFeature>()!;
        var errorMessage = new
        {
            Message = exceptionHandlerPathFeature.Error.Message
        };
        await context.Response.WriteAsync(JsonSerializer.Serialize(errorMessage));
        if (exceptionHandlerPathFeature?.Error is FileNotFoundException)
        {
            await context.Response.WriteAsync(" The file was not found.");
        }
        if (exceptionHandlerPathFeature?.Path == "/")
        {
            await context.Response.WriteAsync("Page: Home.");
        }
    });
});
We have shown here a possible implementation of the middleware. In order to be implemented, the UseExceptionHandler method must be exploited, allowing the writing of management code for the whole application.
Through the var functionality called exceptionHandlerPathFeature = context.Features.Get
1
2
3
4
5
app.MapGet("/ok-result", () =>
{
    throw new ArgumentNullException("taggia-parameter", "Taggia has an error");
})
.WithName("OkResult");
When an exception occurs in the code, as in the preceding example, the middleware steps in and handles the return message to the client.
If the exception were to occur in internal application stacks, the middleware would still intervene to provide the client with the correct error and appropriate indication.
Problem Details and the IETF standard
Problem Details for HTTP APIs is an IETF standard that was approved in 2016. This standard allows a set of information to be returned to the caller with standard fields and JSON notations that help identify the error.
HTTP status codes are sometimes not enough to convey enough information about an error to be useful. While the humans behind web browsers can be informed about the nature of the problem with an HTML response body, non-human consumers, such as machine, PC, and server, of so-called HTTP APIs usually cannot.
This specification defines simple JSON and XML document formats to suit this purpose. They are designed to be reused by HTTP APIs, which can identify distinct problem types specific to their needs.
Thus, API clients can be informed of both the high-level error class and the finer-grained details of the problem (https://datatracker.ietf.org/doc/html/rfc7807).
In .NET, there is a package with all the functionality that meets the IETF standard.
The package is called Hellang.Middleware.ProblemDetails, and you can download it at the following address: https://www.nuget.org/packages/Hellang.Middleware.ProblemDetails/.
Let’s see now how to insert the package into the project and configure it:
1
2
3
4
5
6
7
8
var builder = WebApplication.CreateBuilder(args);
builder.Services.TryAddSingleton<IActionResultExecutor<ObjectResult>, ProblemDetailsResultExecutor>();
builder.Services.AddProblemDetails(options =>
{
    options.MapToStatusCode<NotImplementedException>(StatusCodes.Status501NotImplemented);
});
var app = builder.Build();
app.UseProblemDetails();
As you can see, there are only two instructions to make this package work:
- builder.Services.AddProblemDetails
- app.UseProblemDetails();
Since, in the minimal APIs, the IActionResultExecutor interface is not present in the ASP.NET pipeline, it is necessary to add a custom class to handle the response in case of an error.
To do this, you need to add a class (the following) and register it in the dependency injection engine:
1
builder.Services.TryAddSingleton<IActionResultExecutor<ObjectResult>, ProblemDetailsResultExecutor>();
Here is the class to support the package, also under minimal APIs:
1
2
3
4
5
6
7
8
9
10
public class ProblemDetailsResultExecutor : IActionResultExecutor<ObjectResult>
{
    public virtual Task ExecuteAsync(ActionContext context, ObjectResult result)
    {
        ArgumentNullException.ThrowIfNull(context);
        ArgumentNullException.ThrowIfNull(result);
        var executor = Results.Json(result.Value, null, "application/problem+json", result.StatusCode);
        return executor.ExecuteAsync(context.HttpContext);
    }
}
As mentioned earlier, the standard for handling error messages has been present in the IETF standard for several years, but for the C# language, it is necessary to add the package just mentioned.
Now, let’s see how this package goes about handling errors on some endpoints that we report here:
1
2
3
4
5
6
app.MapGet("/internal-server-error", () =>
{
    throw new ArgumentNullException("taggia-parameter", "Taggia has an error");
})
.Produces<ProblemDetails>(StatusCodes.Status500InternalServerError)
.WithName("internal-server-error");
We throw an application-level exception with this endpoint. In this case, the ProblemDetails middleware goes and returns a JSON error consistent with the error. We then have the handling of an unhandled exception for free:
1
2
3
4
5
6
7
8
9
10
{
    "type": "https://httpstatuses.com/500",
    "title": "Internal Server Error",
    "status": 500,
    "detail": "Taggia has an error (Parameter 'taggia-parameter')",
    "exceptionDetails": [{
        /* for brevity */
    }],
    "traceId": "00-f6ff69d6f7ba6d2692d87687d5be75c5-e734f5f081d7a02a-00"
}
By inserting additional configurations in the Program file, you can map some specific exceptions to HTTP errors. Here is an example:
1
2
3
4
builder.Services.AddProblemDetails(options =>
{
    options.MapToStatusCode<NotImplementedException>(StatusCodes.Status501NotImplemented);
});
The code with the NotImplementedException exception is mapped to HTTP error code 501:
1
2
3
4
5
6
app.MapGet("/not-implemented-exception", () =>
{
    throw new NotImplementedException("This is an exception thrown from a Minimal API.");
})
.Produces<ProblemDetails>(StatusCodes.Status501NotImplemented)
.WithName("NotImplementedExceptions");
Finally, it is possible to create extensions to the ProblemDetails class of the framework with additional fields or to call the base method by adding custom text.
Here are the last two examples of MapGet endpoint handlers:
1
2
3
4
5
6
7
8
9
10
11
12
13
14
15
16
17
18
19
20
21
22
23
24
25
26
27
28
29
30
31
32
33
34
app.MapGet("/problems", () =>
{
    return Results.Problem(detail: "This will end up in the 'detail' field.");
})
.Produces<ProblemDetails>(StatusCodes.Status400BadRequest)
.WithName("Problems");

app.MapGet("/custom-error", () =>
{
    var problem = new OutOfCreditProblemDetails
    {
        Type = "https://example.com/probs/out-of-credit",
        Title = "You do not have enough credit.",
        Detail = "Your current balance is 30, but that costs 50.",
        Instance = "/account/12345/msgs/abc",
        Balance = 30.0m,
        Accounts = { "/account/12345", "/account/67890" }
    };
    return Results.Problem(problem);
})
.Produces<OutOfCreditProblemDetails>(StatusCodes.Status400BadRequest)
.WithName("CreditProblems");

app.Run();

public class OutOfCreditProblemDetails : ProblemDetails
{
    public OutOfCreditProblemDetails()
    {
        Accounts = new List<string>();
    }
    public decimal Balance { get; set; }
    public ICollection<string> Accounts { get; }
}
Summary
In this chapter, we have seen several advanced aspects regarding the implementation of minimal APIs. We explored Swagger, which is used to document APIs and provide the developer with a convenient, working debugging environment. We saw how CORS handles the issue of applications hosted on different addresses other than the current API. Finally, we saw how to load configuration information and handle unexpected errors in the application.
We explored the nuts and bolts that will allow us to be productive in a short amount of time.
In the next chapter, we will add a fundamental building block for SOLID pattern-oriented programming, namely the dependency injection engine, which will help us to better manage the application code scattered in the various layers.
> 返回扉页